Integrating Google Analytics 4 (GA4) with Your WordPress Website: A Step-By-Step Guide
The modern digital landscape is all about understanding your audience. It’s not just about numbers but also about behaviors, patterns, and insights that can drive more intelligent decisions. Google Analytics has been an invaluable tool for this, and with the introduction of Google Analytics 4 (GA4), it has evolved into a more adaptable and user-centric platform.

Why You Should Install GA4 on Your WordPress Site
Just as you would monitor foot traffic and customer behavior in a physical store, it’s equally vital to understand your online visitors’ actions and preferences. Here’s why every small business owner with a website should install Google Analytics.
Google Analytics isn’t just another tool—it’s a strategic partner. It empowers you with the knowledge to grow, adapt, and thrive in the competitive online space. Not utilizing it is akin to navigating uncharted waters without a compass.
Informed Decision Making
Google Analytics provides a wealth of data, from the sources of your traffic to the most viewed pages on your site. By understanding where your visitors come from and what they engage with, you can make data-driven decisions. Instead of guessing what your audience wants, you have actionable insights at your fingertips.
Enhance User Experience
By examining metrics like bounce rate and session duration, you can gauge how engaged visitors are with your content. If a page has a high bounce rate, it may signal that users aren’t finding what they’re looking for, prompting you to refine the content or design.
Enhanced Reporting
With more detailed and customizable reports, you can dive deep into the metrics that matter most to you.
Targeted Content Creation
Google Analytics shows the topics or products that interest your audience the most. Armed with this knowledge, you can create more of the content that resonates, driving engagement and conversions.
Adaptability
Consumer behaviors and preferences change over time. With Google Analytics, you’re not relying on dated information. Instead, you receive real-time data, allowing you to pivot and adapt quickly to changing circumstances or trends.
Ready To Increase Your Online Visibility?
Don’t miss out on potential clients. Reach out to us now and let’s explore how we can collaborate effectively.
Step by Step Video. This includes installing the GA4 tracking code on your WordPress Website.
1. Create a GA4 Property:
Create an Analytics account to collect and organize data. Accounts can access multiple data sources, using one or more measurement IDs.
- Visit your Google Analytics account.
- Click on ‘Admin’ at the bottom-left.
- In the “Account” column, select your account. Under “Property”, click ” Create Property“

2. Account Details
Go ahead and name your property. You can enter the name of your business.,

Click “Next”
3. Create a Property
To measure your web and app data, create a Google Analytics 4 property. Each property you create holds all your measurement data for any websites and apps you choose.
- Here, enter the name of your company.
- Select your country your time zone
- Click “Next“

- Describe your business by selecting your industry
- Select your business size
- Click “Next“
Choose your business objective
For reports that are personalized to your business, select the topics most important to you.
- At this point, you can choose the appropriate boxes. (recommended to select all four boxes. The choice is yours to determine your objectives.
- Click “Create”

You will be asked to accept the Google Analytics Terms of Service Agreement; go ahead and check the box, then click “Accept.“
Unlock your business's full potential online.
Don’t wait for opportunities; create them. Contact us now and let’s transform your digital journey together
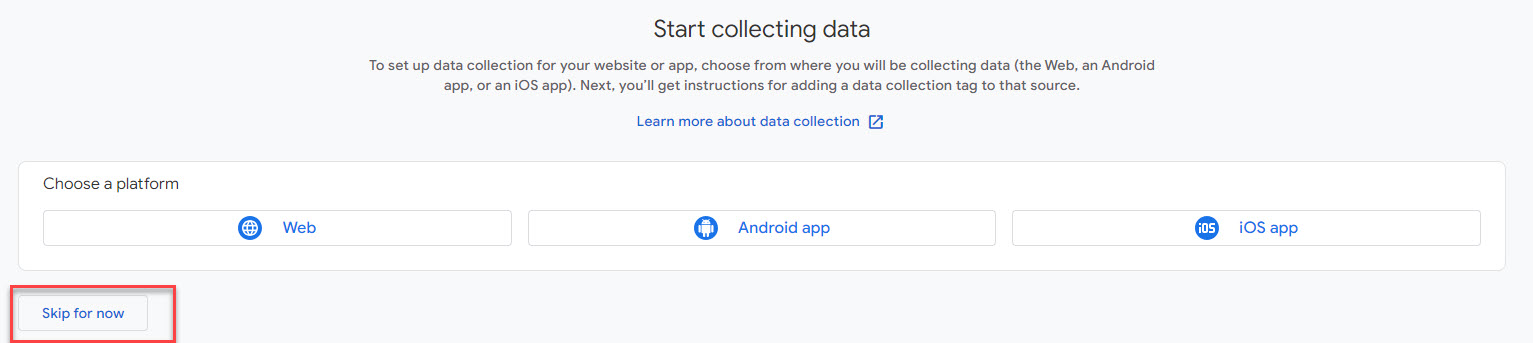
4. Start Collecting Data
Before you can gather insights from your website, you’ll need to inform Google Analytics to start collecting data. Here’s how to get started:
- Click “Skip for Now”: If you encounter additional setup options or offers that you’re not ready to explore, simply opt to skip them. Remember, the goal right now is to initialize the data collection process, and you can always revisit these options later.
- Click “Continue to Home”: This action will navigate you to the main dashboard of Google Analytics. While it may look empty now, this is where all your future data and insights will populate.
After these steps, you’ll be guided to set up your data stream, where you’ll specify which website Google Analytics should track. Once that’s done, your website will begin sending user interaction data to Google Analytics, helping you understand and optimize your website’s performance over time.

Set up data stream
Before diving into the analytics of your website, you need to set up a data stream, which is essentially telling Google Analytics where to look and what to call it.
- Enter Your Website’s URL: Type in the full address of your website, like
example.com. This lets Google Analytics know exactly which site to track. - Enter Your Website Name: This can be the official name of your site or any name you prefer. It helps you easily identify this particular site, especially if you manage multiple websites in Google Analytics.
- Create Stream: Once you’ve filled in the details, click on “Create Stream.” This action finalizes the setup, and your website is now ready to start sending data to Google Analytics for tracking and analysis.

4. Web Stream Details
Imagine “Web Stream Details” as the ID card for your website in Google Analytics. It tells the system which website it’s tracking, using specifics like the website’s address and a unique code. It also has settings that guide how visits and actions on your site get recorded and shown in the reports.

Once you’ve clicked the ” View Tag Instructions,” you will have two options.
- Install with a website builder
- Install Manually (recommended)

The GA4 tag serves as a crucial bridge between Google Analytics (GA4) and your website. But what does that mean, and why is it so essential?
1. The Role of the GA4 Tag:
At its core, the GA4 tag is a snippet of code. When integrated into your website, it operates quietly in the background, monitoring various activities and interactions that users have with your website.
2. Facilitating Data Transmission:
Think of the GA4 tag as a diligent reporter. Whenever someone visits your site, clicks on a link, fills out a form, or engages in any trackable action, the tag records that event. It then sends this information to your Google Analytics account, ensuring that you get a real-time and accurate reflection of user behavior on your site.
3. Customization and Precision:
The beauty of the GA4 tag lies in its adaptability. It can be customized to monitor specific events that matter most to you, whether it’s tracking e-commerce transactions, monitoring video views, or understanding form submissions. This flexibility ensures that you capture data that’s relevant to your goals and objectives.
4. Seamless Integration with Google’s Ecosystem:
The GA4 tag isn’t just about tracking; it’s designed to integrate seamlessly with other Google products like Google Ads. This means that with the tag in place, you can retarget visitors with ads, understand your ROI better, and craft strategies that are more aligned with user behavior.
5. A Step Towards Future-Proofing:
The digital landscape is ever-evolving, and so are user behaviors and expectations. The GA4 tag is built with the future in mind. It’s designed to adapt to new browsing habits, privacy norms, and technological shifts, ensuring that your analytics remain robust, insightful, and compliant.
In Conclusion:
The GA4 tag is more than just a piece of code; it’s the lifeline of your website’s analytics efforts. By enabling clear communication between your site and Google Analytics, it ensures that you have the insights and data needed to make informed decisions, refine strategies, and achieve your online objectives.